
Flying Squirrels #3 – Can you hear me now? – Building a transmitter
Now that I have a list of protocols and a general plan to transmit telemetry on the 20 meter Ham bands, how do I get “on the air”? This post will describe the transmitter hardware for the telemetry system.
Generating Radio Frequency – There is a board for that.
After a lot of searching an experimenting with RF data modules, all of which did not meet my requirements, I discovered a robust and simple module based on the SI5151A Chip. In particular I settled on the Adafruit SI531A Clock Generator board Details of the Adafruit board are here. A similar board is available from Etherkit .
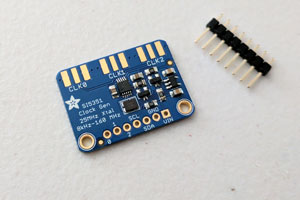
Don’t let the term “clock generator” confuse you, this is not a time piece in the traditional sense. It is a stable oscillator (time base) that can be controlled by a micro-processor, such as and Arduino, and is more than capable of modulating the type of Frequency Shift Keying (FSK) signals required by my protocol choices. In fact, it has been used on many HAB flights, so it is a proven design as well for HAB. The SI5351A is also cheap!
The SI5151A board can produce a signal anywhere from 8Hkz to 160Mhz with a resolution of 0.01 Hz. It can change frequency fast enough for the FSK signals for the WSPR and FSQ protocols. It can produce up to three signals simultaneously, however only one is need in my case. Max output for this board is approximately 20 Milliwatts (mw). QRP to be sure but also proven to work on numerous balloon projects. {link to QRP-Labs}
The only downside to the SI5251A, it produces a square wave output instead of a pure sign wave. A square wave is not suitable for directly connecting to an antenna because it is rich in unwanted harmonics [define] and must be passed through a Low Pass Filter to remove the unwanted harmonics. Fortunately, this can be done with a simple filter as will be described below.
Square Waves
This video from ham radio operator Allan Wolke W2AEW explains how a square wave is the summation of the fundamental frequency plus all odd harmonics.
By the way Allan, produces some of the best electronics and ham radio videos available. Take time to explore his large library of topics and subscribe to his channel. I have learned a LOT from his videos. I highly recommend subscribing to his YouTube channel as he is publishing new informative content frequently.
The SI5351A boards from Adafruit and Etherkit both have Arduino libraries available. Be sure to use the correct one for the board you have. There seems to be some differences that make the board incompatible with the wrong library. There are very minor differences in the calling syntax of the basic functions, but these are very easily adapted. Because I am using the Adafruit board, I will be using their library.
The SI5351A is controlled by a microprocessor through an I2C interface. The board will run at 5 volts or 3.3 volts so it is compatible with common microprocessors, such as the Arduinos and clones, running at either voltage.
I chose the Arduino Pro Mini running at 3.3v for the Flying Squirrel projects. The Pro Mini is small and light, yet still has the memory space needed for the Flying Squirrel projects I am planning. I chose the 3.3v board because it will be easier to power it from a battery (Details in a later post). The 3.3v boards have half the CPU speed as the 5v models, but for the needs of The Flying Squirrels, it is fast enough. The pro mini is also a cheap processor, so it is keeping me within my budgetary design goal.
The Low Pass Filter
To remove the unwanted harmonics from the square wave generated by the SI5351A, I run the signal though a Low Pass Filter (LPF). The job of the LPF is to “not pass” frequencies above the design limit of the filter. The ham radio rules state that the harmonics must be suppressed -30db or more from the fundamental frequency. For example, a 14Mhz square wave is going to have the fundamental frequency of 14Mhz and then the next odd harmonic will be 42Mhz and then more odd harmonics above this. LPFs are designed to start reducing the power of unwanted frequencies, and then decreases ever higher frequencies until the -30db goal (and more) is attained before the 3rd harmonic. A lot of engineering can go into designing the perfect filter. Such filters may require hard to find values of capacitors to realize. Fortunately, other hams have already designed filters, using commonly available part values, and supply kits, that will work for our needs.
The LPF filter described below, for 14 Mhz, starts reducing frequency above the top of the 20 meter band 14.350Mhz and reaches -30db at 22 Mhz, well below the 42Mhz 3rd harmonic.
Building a filter from scratch is not too hard, once you source the parts. I needed to buy toroid cores, wire and capacitor values needed for the filter. Typically, the electronic parts are sold in bulk, so you end up with more material than you need for a single filter. I found my parts on Ebay and Amazon.
Since, I decided to build my own filter I paid more up front for bulk parts, because I wanted to build more than one filter over time. However, if you are only building one or two, the QRP-Labs LPF filter kit is the way to go. You get the extra benefit of a designed PCB board with the kit.
Instructions for building you own LPF are available from the GQRP Club here. The QRP-Labs Kit instructions are also helpful as these are essentially the same filters.
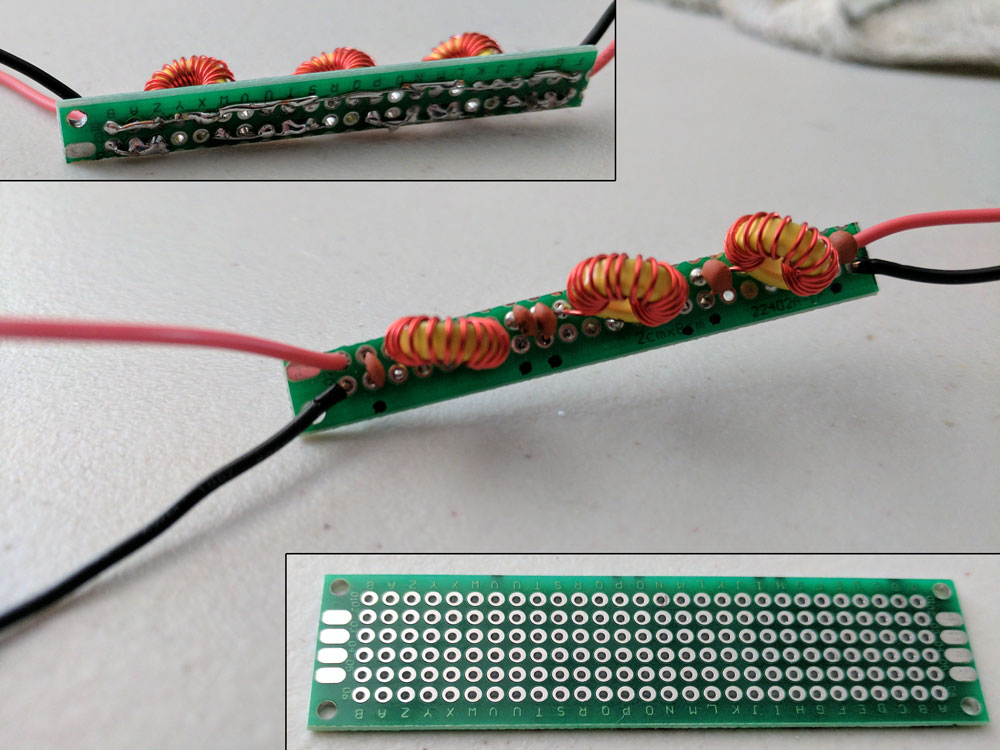
I built my filter on a small length of proto-board cut from a larger piece to reduce weight. I also did not have exact capacitor values on hand for 20meters, so I used two capacitors in parallel to make the needed values.
The output of the SI5351A Clock 0 pins connects to the LPF input and then the antenna is connected to the output of the LPF. Since the LPF is symmetrical, it does not matter which end of the filter is input and output.
Next up I will discuss the design of the antenna portion of Flying Squirrel #1
73s de Don KJ6FO