
Ham radio on the go. – The Ground Squirrel Station “Go Box”
One of my interests in ham radio was to develop the ability to grab my radios and take them outside the shack and be able to operate quickly. Having a mobile station in the car facilitates this need if you are going to a place where there are roads and you are willing to operate in a car, potentially in the hot sun. But if you want to operate at a hike-in camp site, or in a campground with a real table, a hotel room etc. something easier is desired. I am also asked to give radio presentations to ham clubs and the ability to bring my station along for a live demo is also a capability I needed to have.
Loosely defined, I wanted a “Go Box” setup. A fully functioning station inside a box that can be grabbed on short notice and quickly set up outside the normal ham shack.
Every ham that builds a go box, has a different set of needs, desires and budget, so typically each setup is unique. This article will explain my portable setup and I will not delve into a detailed step by step set of instructions, but rather give a few design ideas and considerations along with info that can be used to design your own setup. Most of my Go Box Station construction is straight forward given some basic tools like a tape measure, drill, pliers, cutters and a soldering iron.
My goals:
- A “grab and go” portable station in a box(s)
- Running on battery power for several hours at a time between charges
- Solar recharging capability, when no AC power is available
- The ability to operate digital modes and voice modes
- Operate on Ham 80m through 70cm bands (HF through UHF)
- A modular approach, to radio, power and antenna. Only bring what is needed for an operating situation
A modular system
The modular approach I have taken reflects a number of different operating scenarios that I have operated in.
- Chasing a Flying Squirrel HAB flight in a car where power and maybe an antenna are available on the car, but a fully featured HF/VHF/UHF radio is not part of my daily car setup.
- Field day, where a complete station is needed, but power may or may not already be provided by a club’s generators.
- RV Camping where I already have ample power from onboard batteries (diesel & solar charged).
- Emergency Operations Center (EOC) operations where power may be available (or not) and a preexisting antenna may be installed.
- Remote camping where a full station, power and antenna are needed.
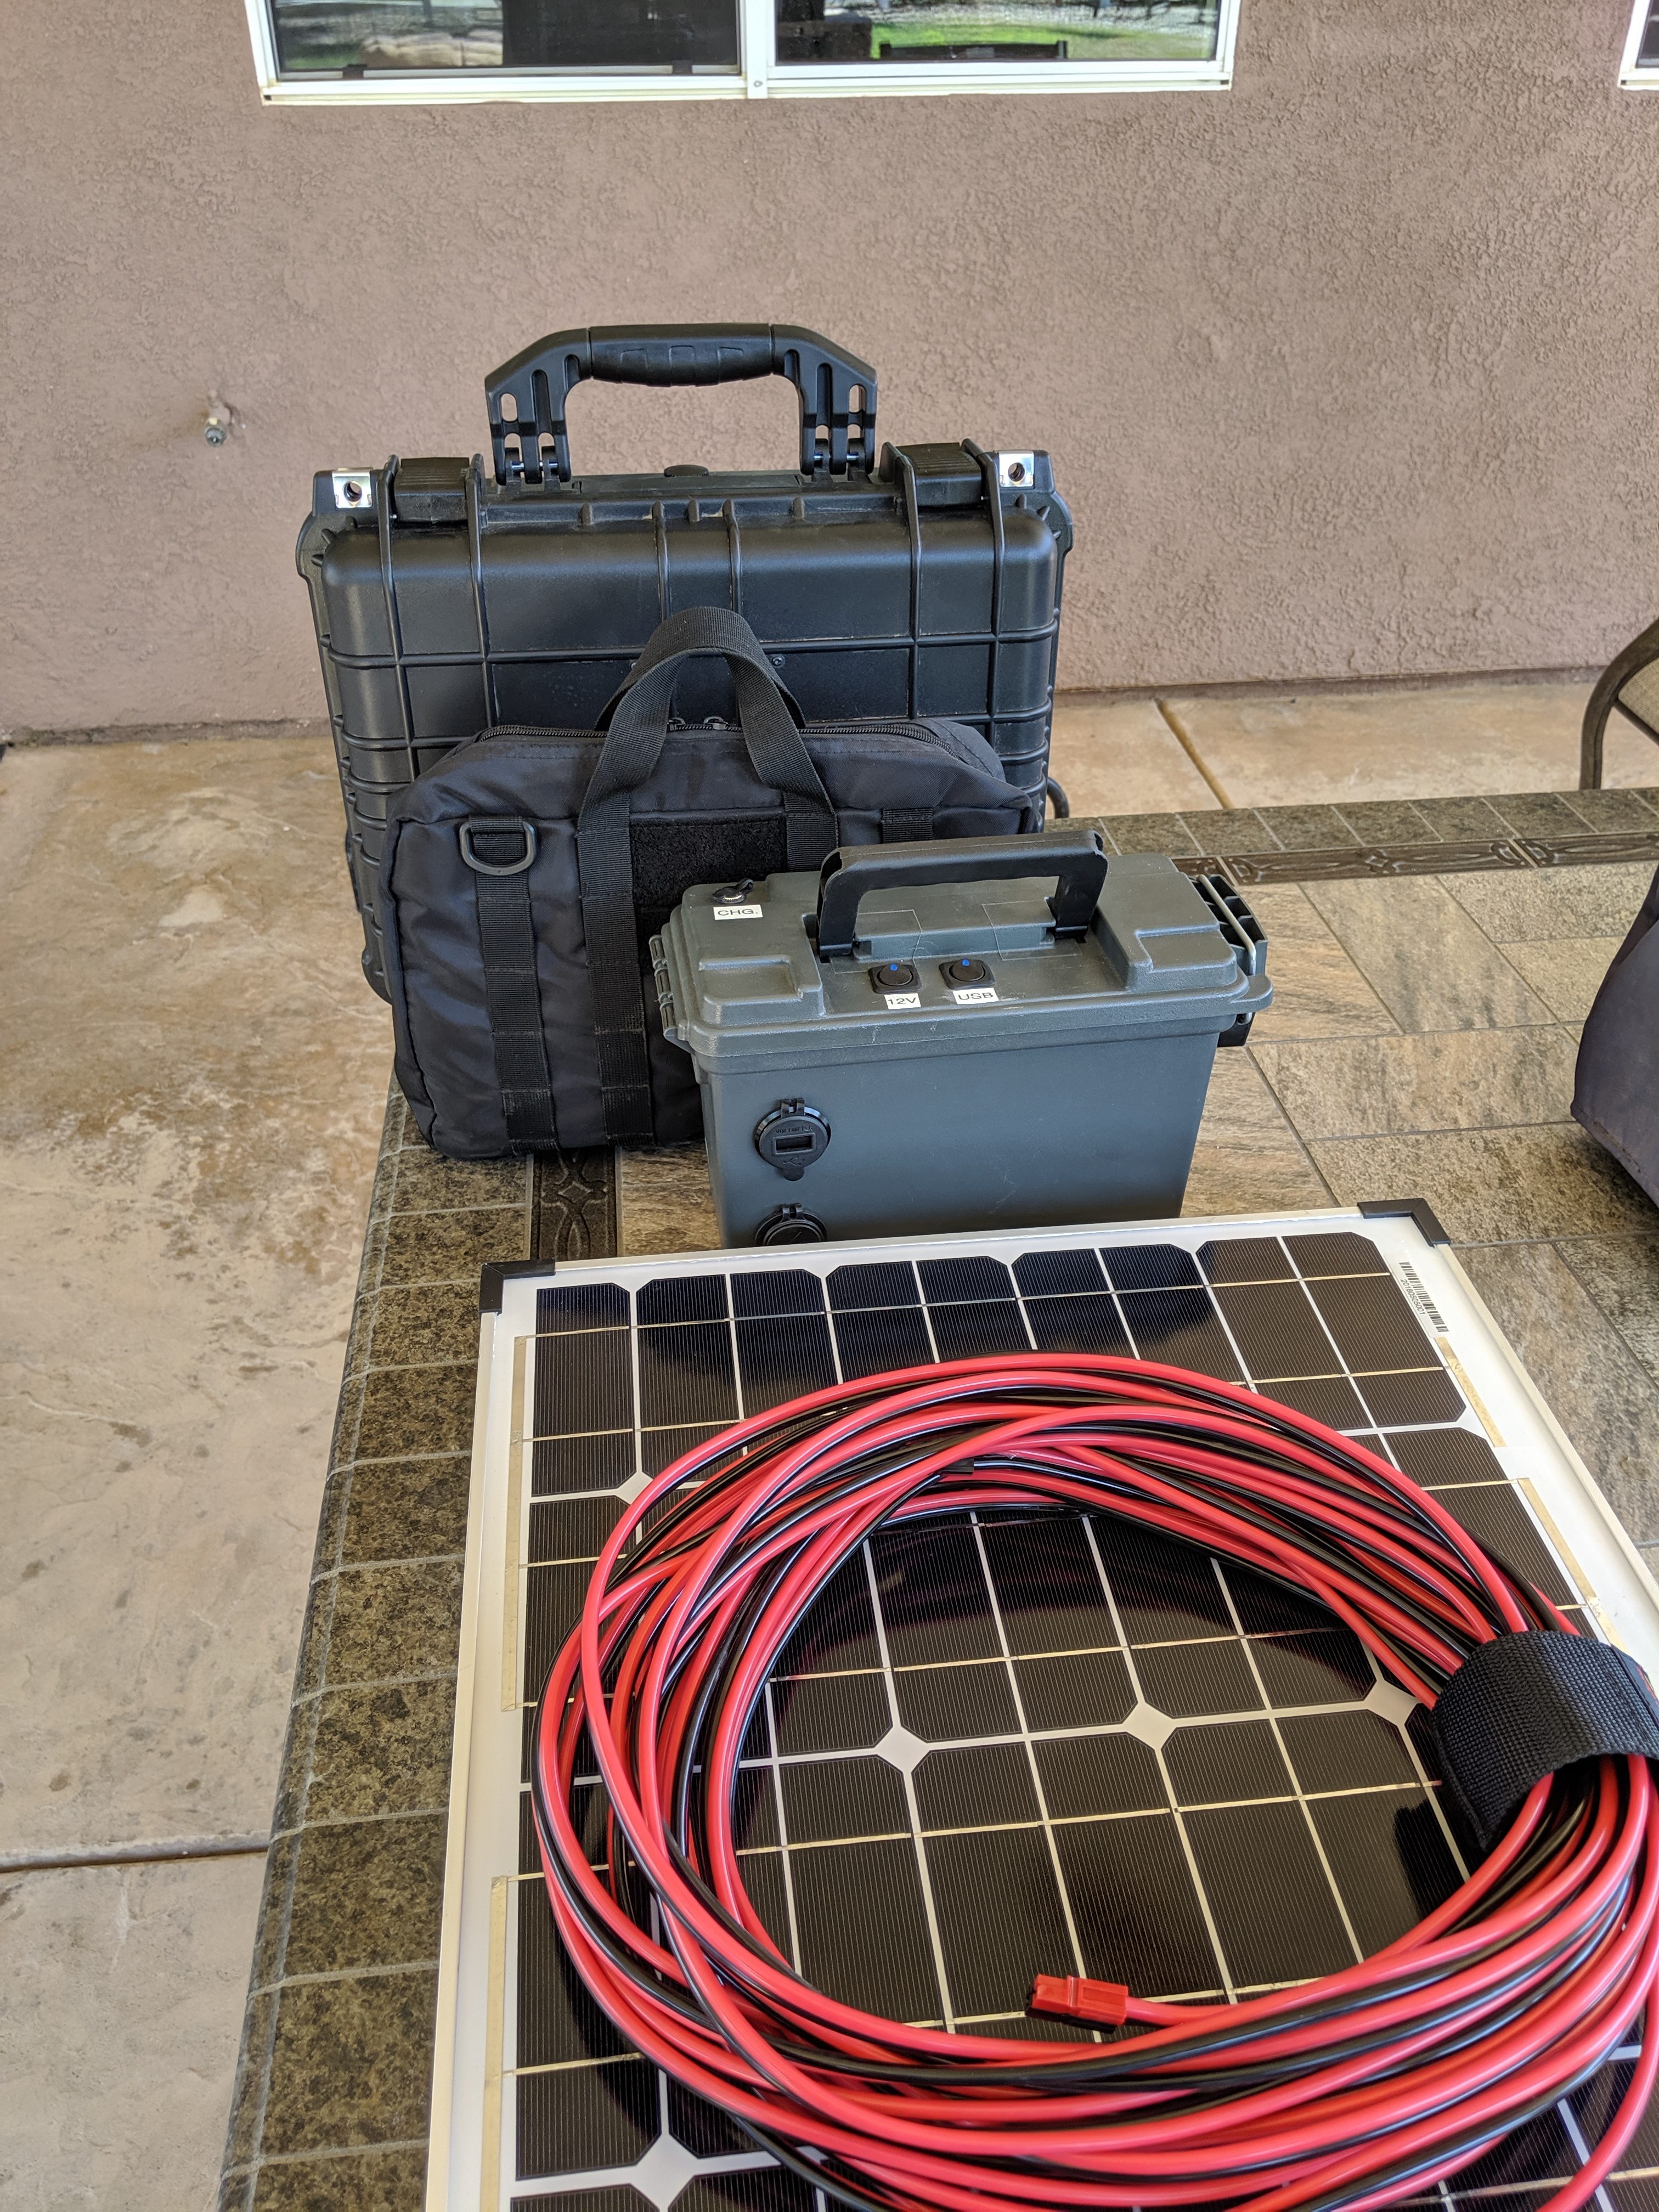
My modular approach breaks down into three separate boxes, each of which is easy to grab and bring along.
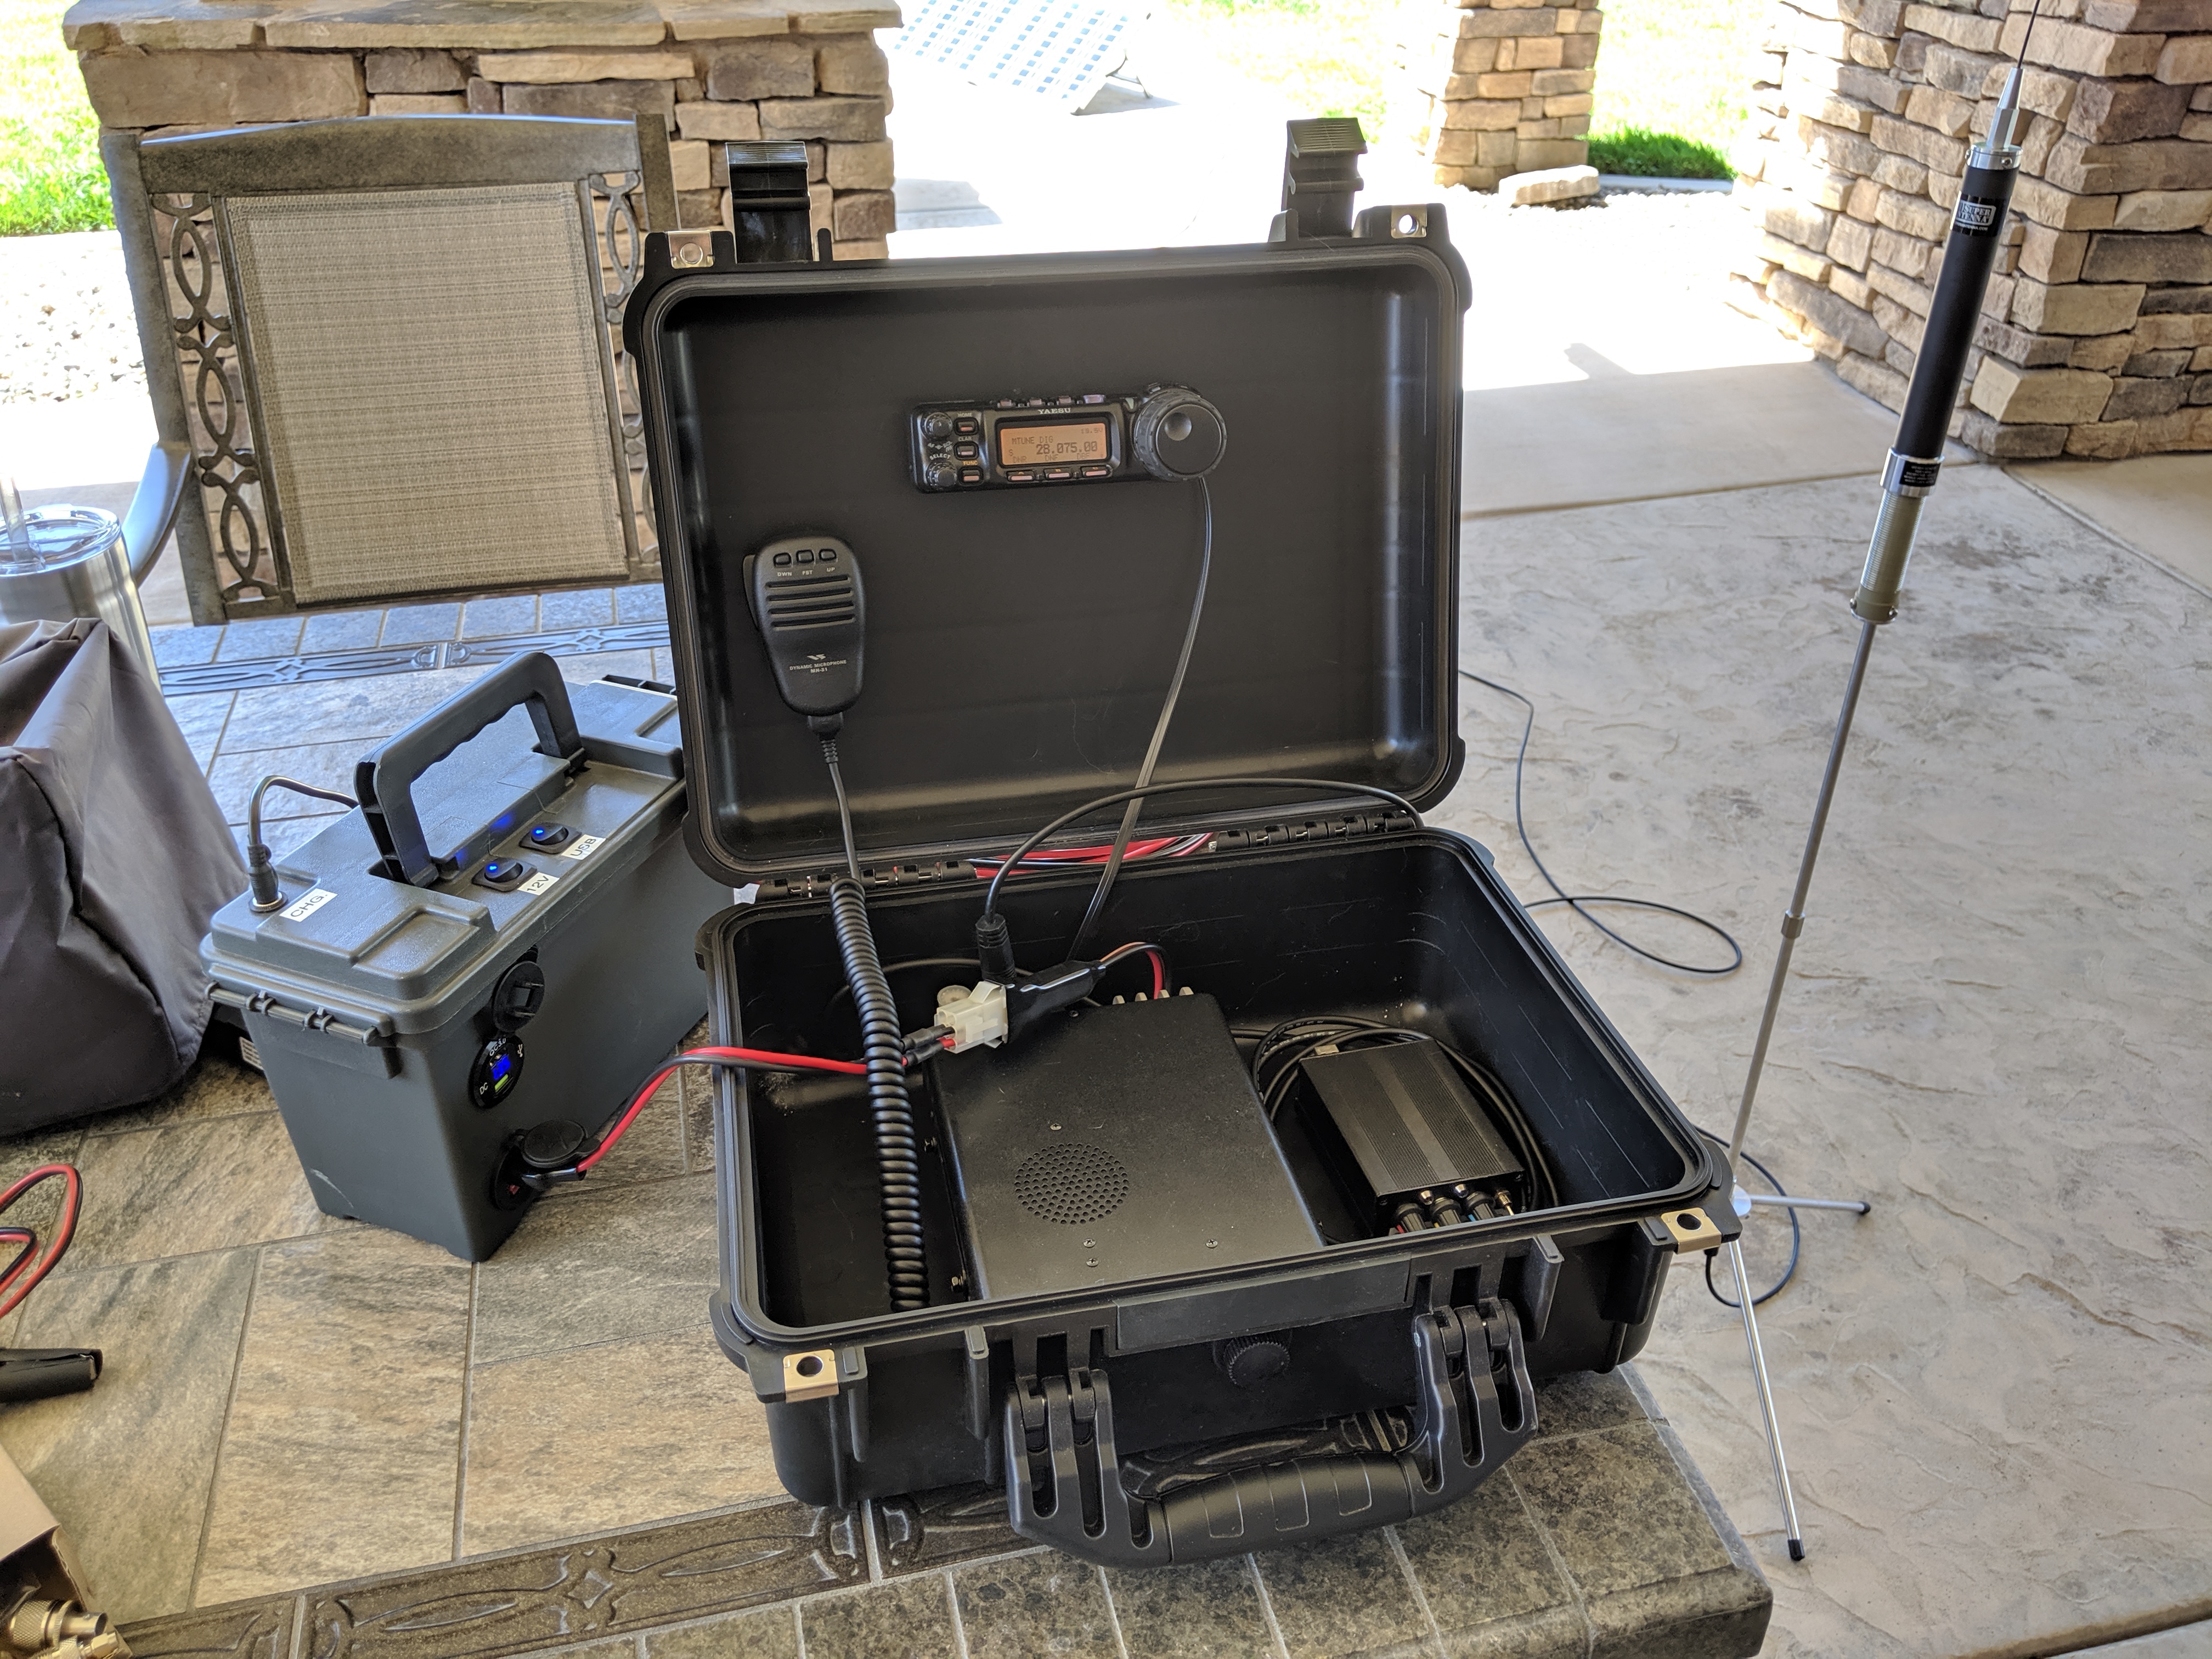
Box 1 – The radio box
The radio and all the supporting cables & gear to operate on my desired bands and modes.
Box 2 – The battery box
An ample supply of 12v power with the ability to also plug in USB based devices, like a phone or tablet.
Box 3 – (Actually in my case a bag) Antenna System
Everything needed to set up an antenna system in the field.
The Boxes
The Radio Box – Box #1
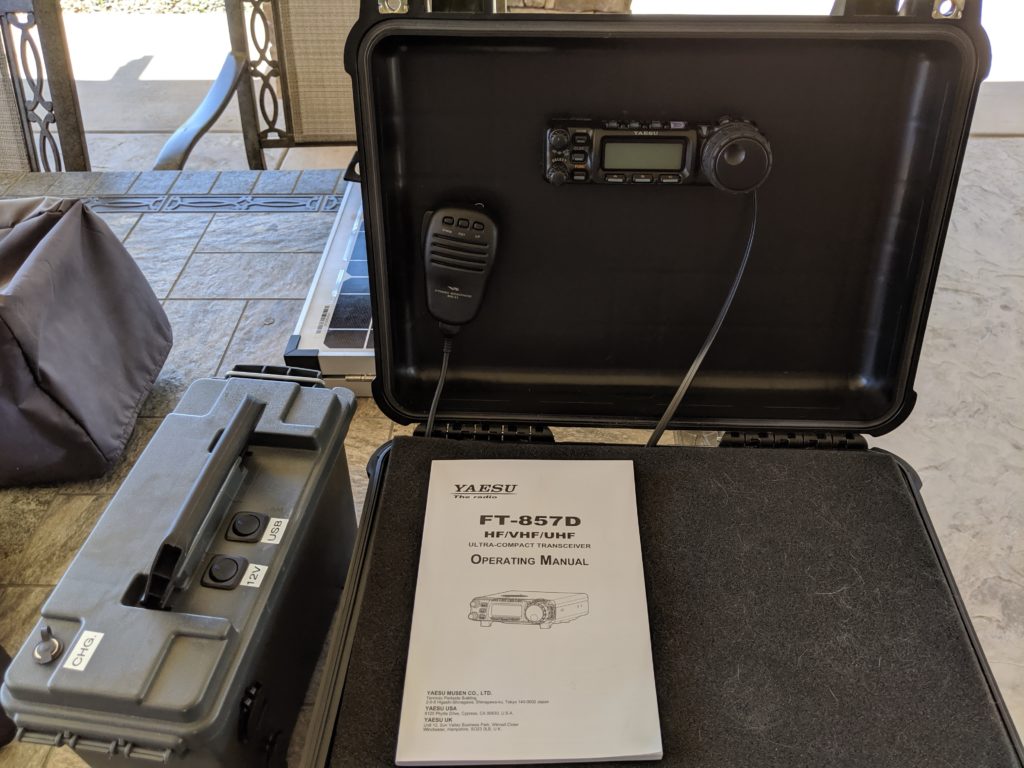
In all of my scenarios the radio box is the one box I will always need to bring. My portable radio of choice is a Yeasu FT857D, which is a compact fully functional 100 watt HF,VHF & UHF radio. The FT857D radio has a remote-able face plate that I chose to mount on the lid of my box.


There are other equally suitable radios with remote faceplate options. Without this feature I would have to lift the radio out of the box to see the face plate and operate. With the faceplate attached to the lid, I can just open the box, connect power and antenna and the radio is ready to operate.
The box I chose is the Apache model, available from Harbor Freight tools. It is a rough equivalent to a Pelican case, but far cheaper. I am sure the Pelican cases are better made, but the Apache is built well and strong enough for my application needs. One advantage of the Apache cases is that the lid does not open all the way flat, so the lid is held securely in a position where the radio faceplate is easily seen. The model I used is the Apache 3800 case: https://www.harborfreight.com/3800-weatherproof-protective-case-large-black-63927.html These cases are available in a number of sizes and it is possible to squeeze a FT857 station into the next size down (2800 model) for storage, but I also wanted room for extra cables etc. The 2800 model is also about an inch less tall and the faceplate knob, mounted on the lid, may contact the top of the radio before the lid closes shut. If you have a lot more gear, larger boxes are available.
The FT857D, at time I purchased it, came complete with mobile bracket and separation kit.
I placed the radio on the mobile bracket and centered the radio front to back inside the box to allow room for the radio to “breathe”. 100W radios generate considerable heat and you need to let air flow over the radio heatsinks to keep the radio cool. (Hot radios die early deaths). I made sure there was enough room at the back of the radio to mount connectors for antenna and data ports to radio without having to remove it from the bracket.
The radio is placed off center towards the left. This leaves room on the right to mount my home brew sound card (Roughly the size of a signal link sound card) on the right side of the radio with room to adjust the controls. I left just enough room on the left for some storage of cables and parts accessory boxes etc.
I mounted the faceplate to the lid using the supplied separation kit bracket. If you don’t have a bracket, some creative use of spacers and Velcro will probably work as well. The separation kit cables are long. The bundled-up cable takes up too much space, so I opted to replace the faceplate cable with a shorter 4 ft RJ 12 cable purchased from amazon. https://www.amazon.com/gp/product/B0766PB9G9/
The face plate is centered horizontally on the lid but raised up to a comfortable viewing angle for my eyes when the box is placed on a desk. This placement leaves open space below the faceplate to add additional accessories in the future. (Meters? Speaker?)
Finally, I mounted the microphone holder to the lid left of the radio with plenty of room for my hands to comfortably grip the microphone and remove it from the clip.
An IMPORTANT NOTE about mounting the brackets to the box. The Apache boxes have re-enforced ridges on the outside of the box. You can easily see the locations of these ridges from inside the box. Position your screw holes to avoid running into these ridges. My radio included all the hardware needed to mount the brackets and radio, except for the mic holder which was supplied with machine screws. I used the bolt and nut versions (vs screws) that Yeasu supplied. I placed my radio in the topmost mounting holes of the mobile bracket to allow clearance of the screws without having to cut them and this allows for more free air space under the radio to allow it to “breathe” better.
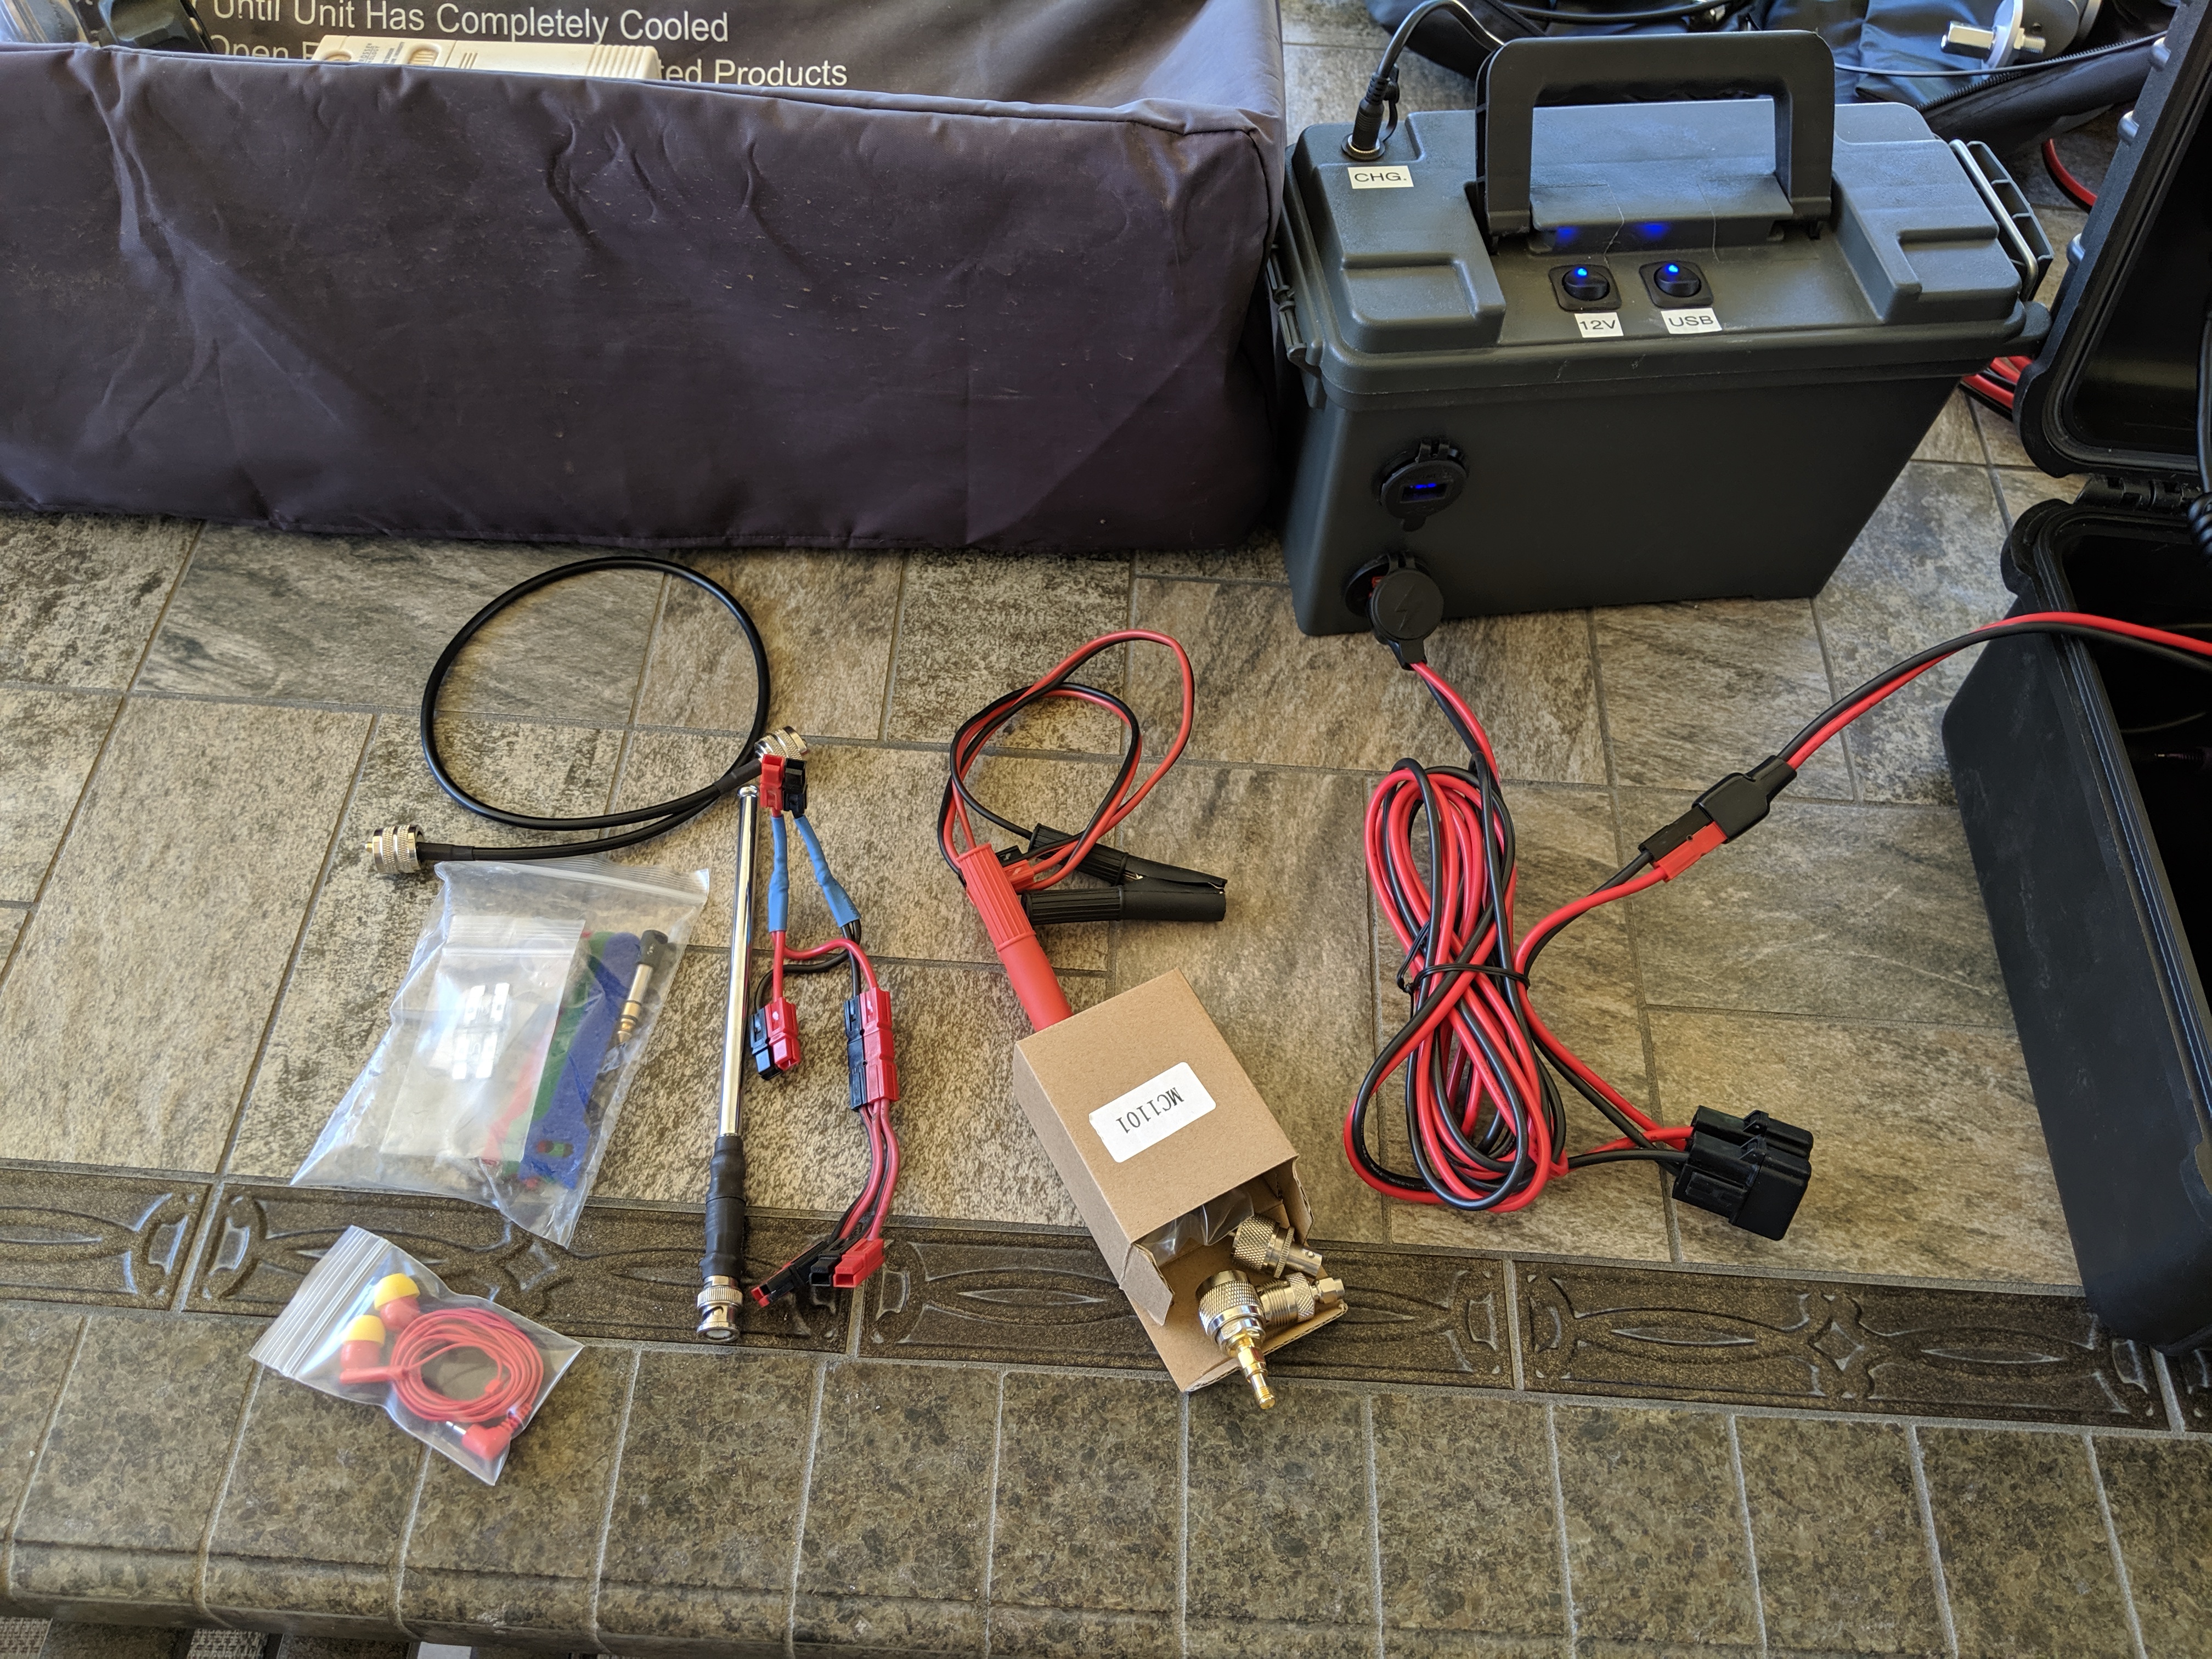
To make hook up of the antenna connections easier, I mounted 90 degree SO239-PL259 adaptors to the antenna ports on the back of the radio. I found trying to bend a coax into position and screw it into place was just too tight of a fit with some of my stress relief cable ends.
The Apache boxes are claimed to be watertight and probably are as long as they are not submerged below water. My Go Box will probably stand up to a lot of rain and may float on top of water when closed, but I did not want to test my Go Box around water to verify this. To keep my box as water resistant as possible, I sealed the screw holes with silicone sealant. I don’t plan on floating my box, but this should be able to keep rainwater out while moving the equipment from a car to a safe weather protected operating position.
My box still has plenty of room to store cables and accessories. In this picture I have a USB cable for hook up between computer and sound card interface, extra power cables, various connector adapters (ex. PL259 to BNC SO239 extenders etc.). I have included some extra fuses for the radio and a right angle screwdriver to dismount the radio from the mobile bracket. I keep the smaller parts in plastic zip locks or a small box to keep them from flying around inside the box during movement.
I also keep a small coax patch cable in the box in case I need to hook up to an existing antenna connection.
The Battery Go Box – Box 2


I designed my battery box to support my Radio Go Box. Making the battery a separate module, I can choose to bring it with me or not depending on the situations I need to operate in. When I have plenty of AC power, I will bring a power supply instead.
When running on battery power I wanted the ability to operate my FT857D radio, not known to be super power efficient, for a large part of the day without recharging. I also wanted to be able to power USB devices like my cell phone and tablet from the same battery.
The battery I chose is based on LiFePO4 chemistry which is lighter and more power efficient than a sealed lead acid battery. Initially I designed for a 15 Amp Hour LifePO4 Batter but later upgraded to 20Ah to support operating my radio at a full 20Ah discharge rate if I needed to. More often I will operate at reduced power of 5-10 watts (QRP) to make the battery run longer on a single charge.
Inside the battery box. Room for power adapters and USB cablesNOTE: The battery manufacturer I purchased from, at the time I write this article, has incorrect specifications on their website, and until they resolve this problem, I will not be able to recommend them as a supplier. The battery so far appears to work well. I just can’t tell if the specifications on the website or the label on the battery is correct. I suggest that you verify the specifications with your supplier in any case as they may be subject to change. The two most important specifications to me are the amp hour rating (capacity of the battery) and the amps that you can draw continuously from the battery. A 100w radio draws about 20 amps continuous at full power. LiFePO4 batteries have a battery management system that will protect the battery by shutting down if there is too much current draw.
I placed the battery inside a plastic ammo box I purchased from Harbor Freight Tools https://www.harborfreight.com/ammo-dry-box-63135.html?_br_psugg_q=ammo+box
The plastic of the box is sturdy enough to hold this LIfePO4 battery and the plastic is easy to work with using common drills and hole saws.
All of my 12 volt connections use Anderson Powerpole connectors. In my opinion all 12V connections in a ham radio system should use these connectors.

I have two switches on top of the box to control the power to the two output ports. The first switch labeled “12v” connects power to the Anderson Powerpole port https://powerwerx.com/panelpole-panel-mount-powerpole-housing on the side of the box and the 2nd switch labeled “USB” connects power to the USB/Volt meter port. https://www.amazon.com/gp/product/B07Q6JGX1L/. I like the combination of the 2 USB ports and a volt meter. This avoids adding a third hole in the box to mount a volt meter. Since the USB port has to convert 12v to 5v USB power, it consumes a small amount of power while connected. I added the switch to disconnect this power drain when the ports are not needed.
The switches I used are rated for 20a at 12V DC. https://www.amazon.com/gp/product/B008UTX208/
The battery is fused with a 20A fuse inline to prevent current overdraw.
The battery I used is connected with an Anderson PowerPole connector for the battery output and a 5.5 x 2.1 mm DC power connector for the charger port. I mounted a panel mount 5.5×2.1 connector with a dust proof cap to the top of the box so I don’t have to open the box to charge. The battery is mounted inside the box with two small strips of Velcro. The Velcro holds the battery very snugly in place and I recommend not using too much Velcro because it can be hard to pry the battery out of the case once inside. The battery can then connect to the box using the supplied connectors without modification.
The Antenna System
The final component of my three part Go Box system is the antenna box… actually it is a bag. After seeing a Super Antenna in action, I wanted one. This is a very compact HF,VHF,UHF antenna system that is quick and easy to deploy. All the parts of the system fit into a bag measuring 12” x 9” (approx.) I can set up the antenna in about 15 minutes or less and tear down in about 10 mins. Their procedure for tuning the antenna is easy and quick to follow. A supplied ruler helps you set the main coil to about the right place and then a few further fine tuning adjustments are needed to get a good SWR. I love this antenna system!
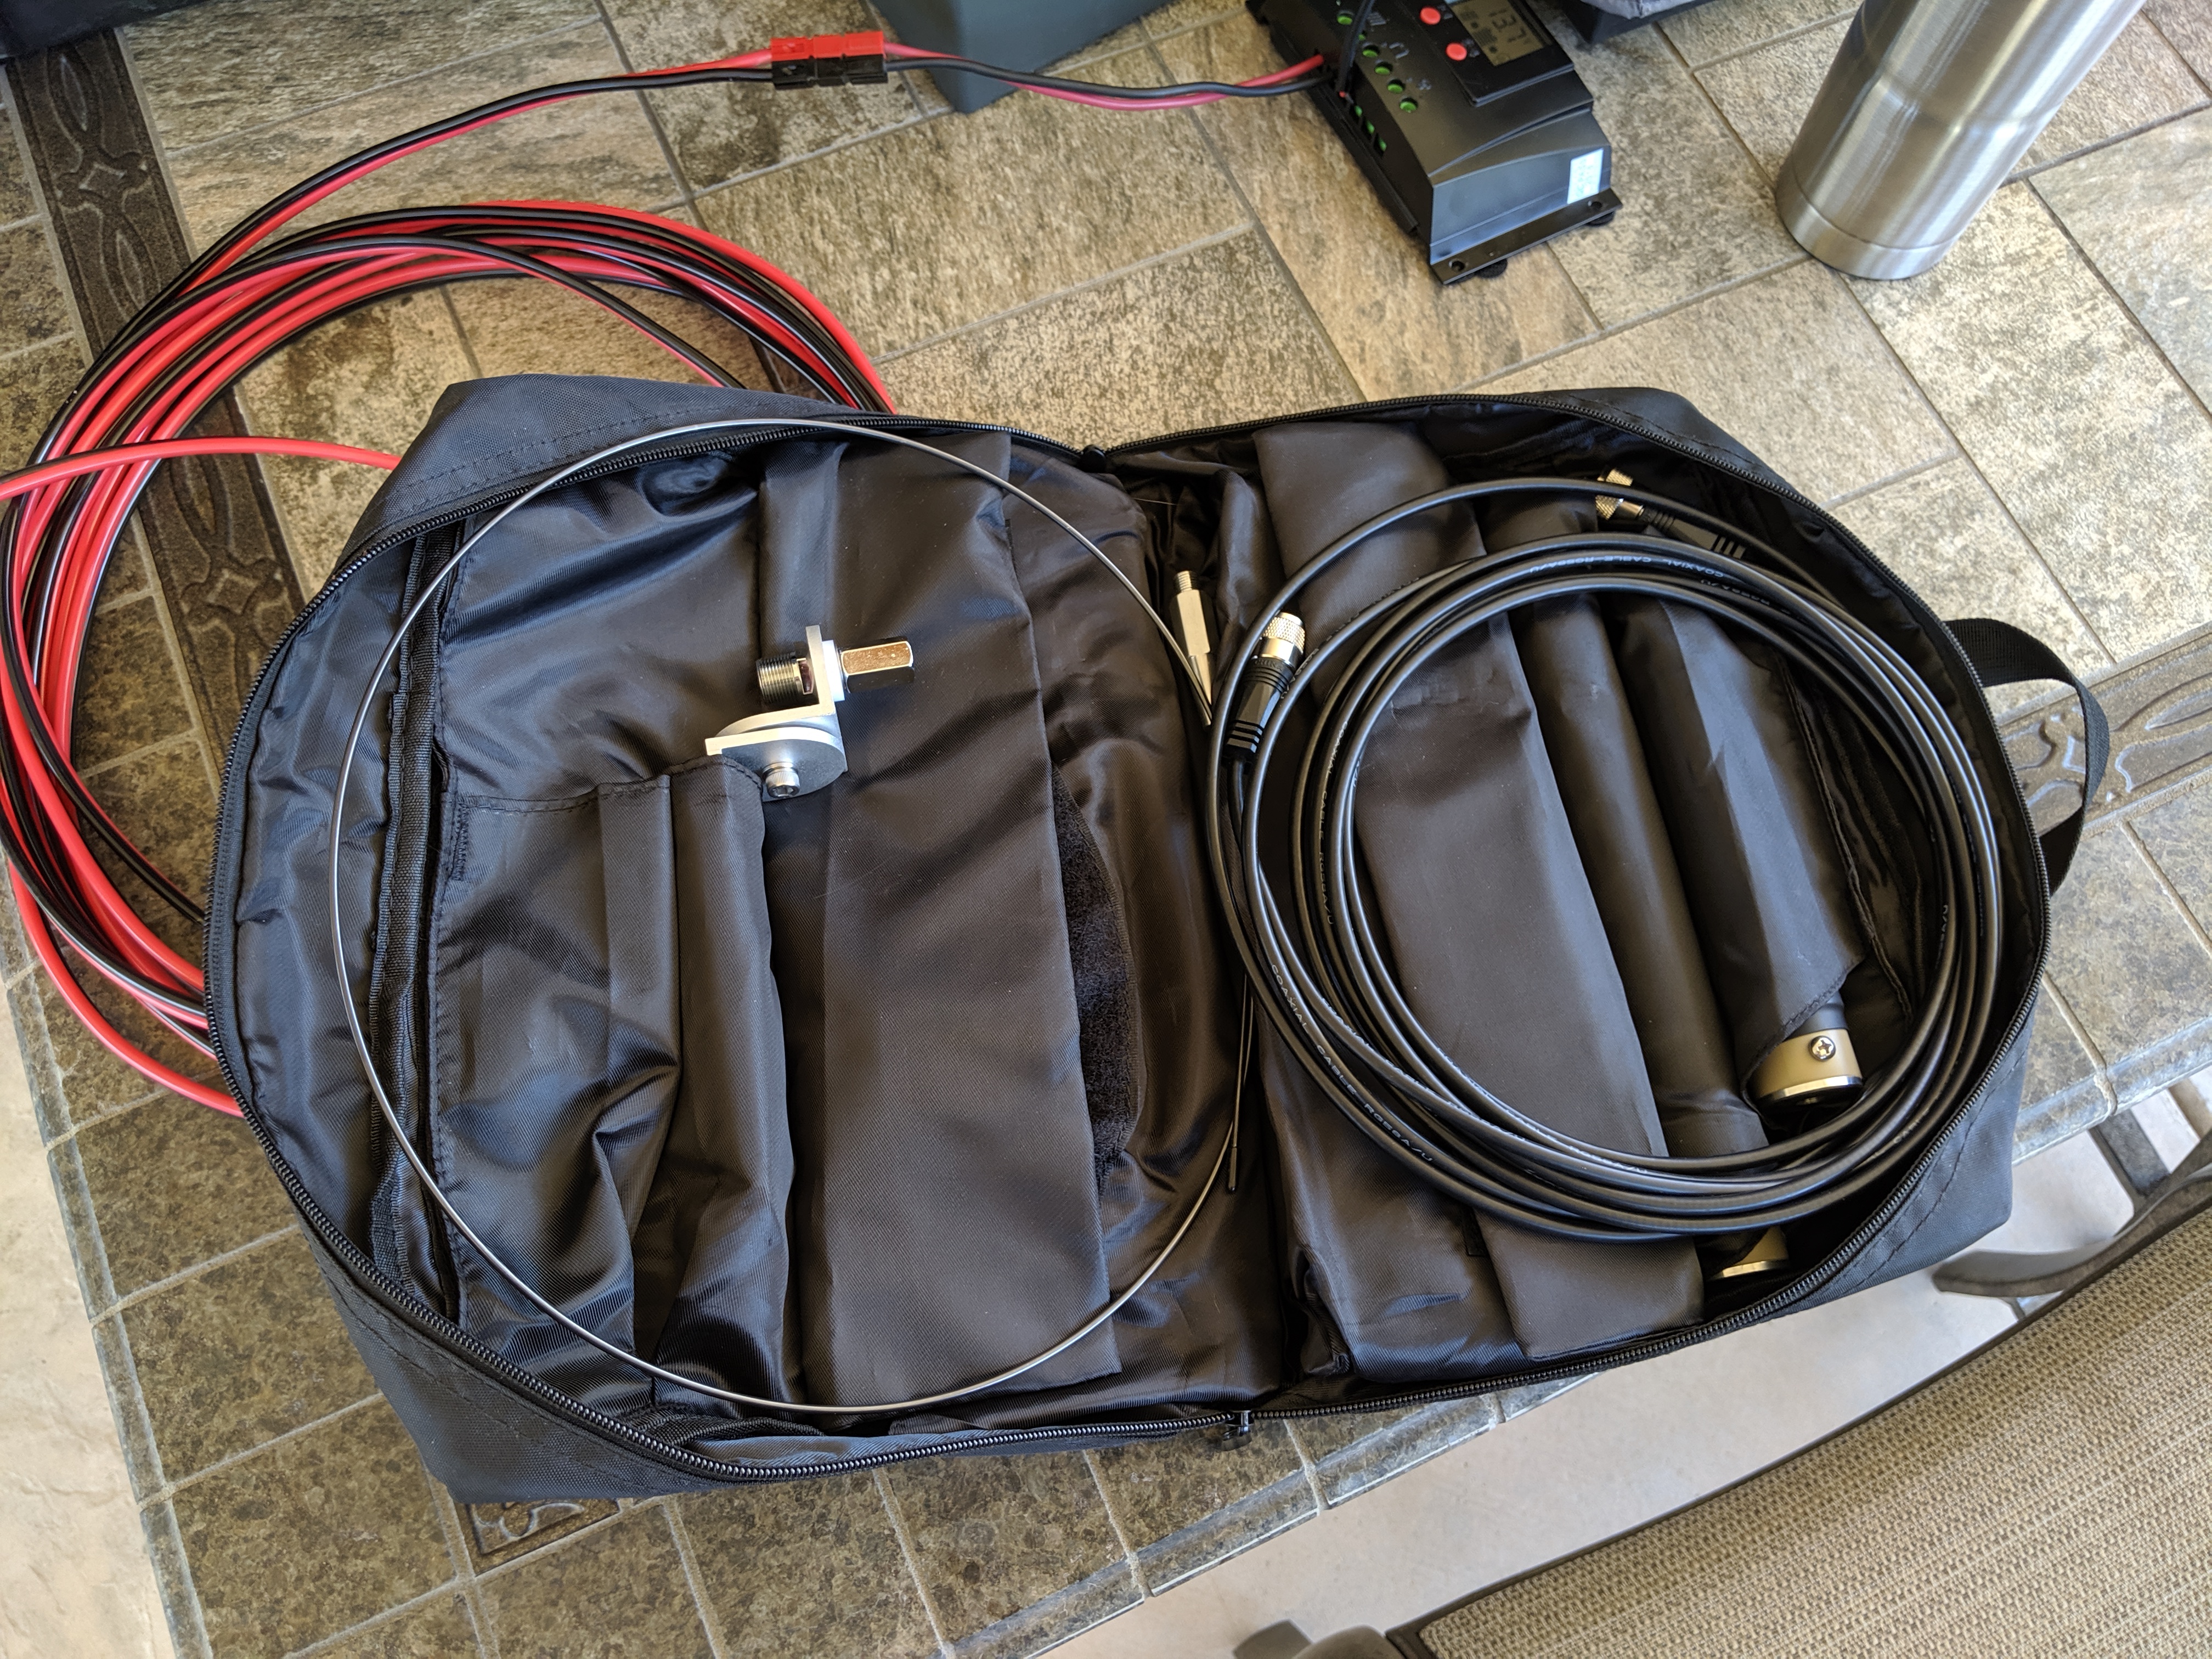
The Super Antenna System has multiple options for mounting the antenna to existing objects like a picnic table or pole. Or you can opt to ground mount it with a variety of tripod options. Most often I have used the low profile tripod as it works very well. There are options to set the antenna higher on a photography style tripod and I have tired that as well, but I find the results not much different and it takes longer to set up the extra equipment.
I also carry a small telescoping whip antenna for 2m that I can quickly mount onto the radio with a BNC adaptor. This will let me operate low power 2m without a lot of setup time. The antenna I have was made years ago by AEA. A similar current antenna is the Diamond Antenna model RH205. You can find lots of BNC or SMA mount antennas for handhelds that will work. Just be sure not to run more power to these antennas than they are rated for.
Conclusion
I am very happy with my Go Box System. One may ask, “Does a small portable system work well?” Listen to my portable station being received by KB6BZZ mobile on the 40 meter band one morning. I was camping in Mammoth Lakes, CA and he was in his parked car near Victorville, CA. (About 250 miles apart) Portable to mobile when band conditions are at the solar cycle minimum. I was discussing how I was able to copy him very well once I turned off a near by power inverter (not part of my system) that was creating a lot of RF noise.
2 comments to “Ham radio on the go. – The Ground Squirrel Station “Go Box””
Dylan - May 10, 2020
This is super cool! Do you have a step-by-step or parts list for the battery box?
admin - May 12, 2020
Thanks for the compliment Dylan.
I don’t have detailed step by step instructions or a parts list. The ammo box was from Harbor Frieght tools. The switches, the USB/ Voltmetter etc were all readily available parts on Amazon. I highly recommend using Anderson power pole connectors to connect the box and radio together. (Also available on Amazon). If Amazon is not available to you, the parts could also be found on EBay and similar sites. The battery is a LIFePo from Bioenny power. https://www.bioennopower.com/collections/12v-series-lifepo4-batteries
The goal of this article was to share some ideas on how to design a box for your needs. Each of us have different goals, so you can adjust these ideas to your needs. All the wiring is basic stuff. Just be sure the wire guages you use can handle the current you will be drawing. I found that shrink wrap tubing is great for insulating the ends of wires where they attach to switches etc.
I went with a 20AH size battery, but you can choose the size you need to power your equipment and operating needs.
73s Don KJ6FO